Using RMagick to generate image montages
While creating my first CLI application in Ruby, I wanted to print images of superheroes to the terminal. I was able to do so with the magic of the catpix gem. However, with all the magic of catpix, it only has the ability to print one image at a time vertically in the terminal. It was not able to display images horizontally next to each other.

I looked for an alternative terminal image displayer/viewer but was not able to find any convenient gems which would allow for horizontal image display.
However, while searching, I did come across an alternative solution — maybe I could composite the images together and then display that! With that idea, I looked into image processing library called ImageMagick, which is able to create and edit image files in many different ways and methods.
Conveniently for me, Ruby has a gem that interfaces with the ImageMagick library and functions named RMagick. I decided to try to use ImageMagick’s montage function in order to try to generate the images I wanted to display programmatically.
Getting Started
To get started, you need to run gem install rmagick and call require 'rmagick' in your CLI environment files. You may encounter some issues with a Failed to build gem native extension. error. If you do, you may need to install or rollback to ImageMagick 6 in order to utilize RMagick. You can do so with these commands:
brew install imagemagick@6
brew link --force imagemagick@6
gem install rmagick
Then, we can get started on writing code using RMagick!
Code Example
In order to work with RMagick, we first need to create a Magick::ImageList object, passing in any number of images and setting it to a variable. Then, we can call any number of ImageMagick methods on the list of images. You can see the methods and their usage here.
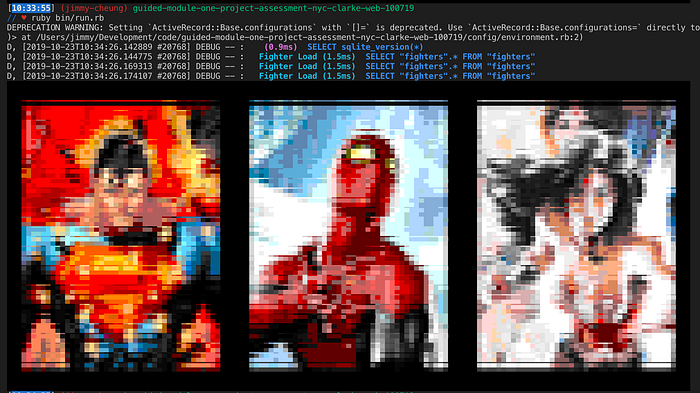
To create a new image, we will focus on the montage method. In the code block of the method, you can pass in parameters to adjust the features of the montage. In the above code example, from left to right in the code block, I tiled the montage 1 row by 3 columns, set the background_color to black, and set the geometry of each image to 130 x 194 pixels and 10 x 5 pixels between each column of tiles and row.
Then, to save the image for future use, I called the “write” method on the montage to save to a directory.
Lastly, I called Catpix.print_image on the file to print it to the terminal.
Other Montage Parameters
There are many other montage parameters that you can use to customize your montage. For example, you can add labels to the montage by setting the ‘Label’ property of each image list. You can also adjust the frame parameter to custom set a frame.
Conclusion
RMagick is a great tool to use to manipulate images. This is just the tip of the iceberg that is the ImageMagick library. If you need to programmatically manipulate, edit, or create images, please consider looking into one of RMagick/ImageMagick’s many tools, such as the montage method.